


It’s time to open up those pools!
As I look through the window in our offices in the South of England, I can see the sun just start to peak through the clouds, letting us know that Summer is finally on its way.
For you lucky pool owners, that can only mean one thing – it’s time to open up your pool!
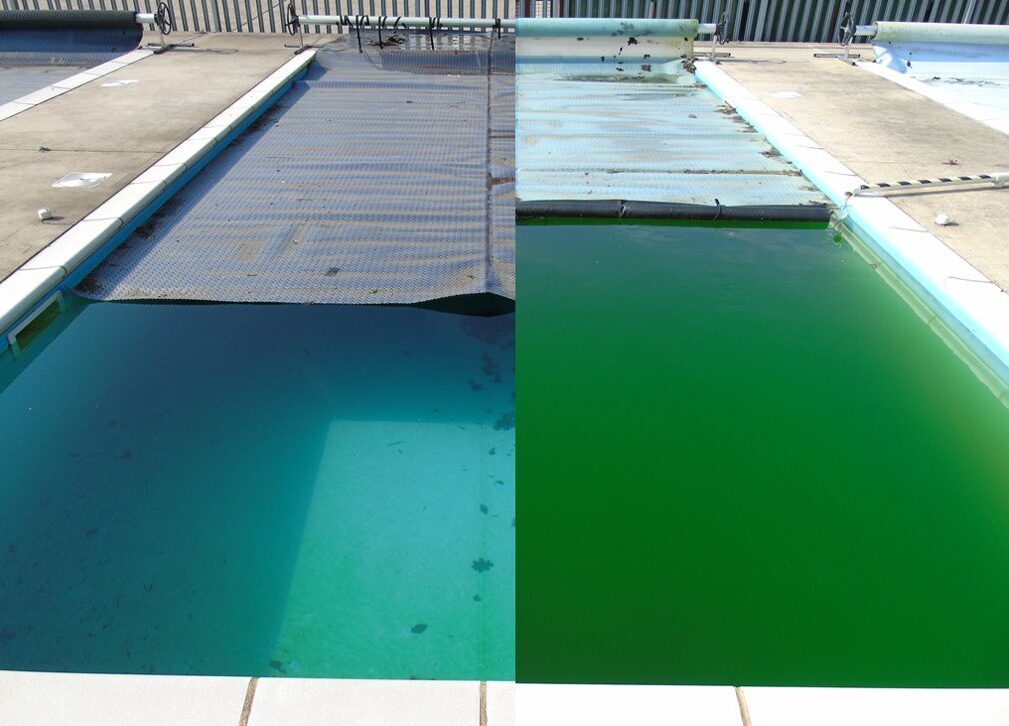
Peel back that cover – how’s the water looking? Have you managed to avoid algae blooms, or are you gazing into a pool full of what can only be described as ‘pea soup’?
This picture shows a composite image of a pool left over the winter period with a transmission (transparent) cover and one left with EnergyGuard™ Selective Transmission.
Here at our unique testing facility on the South Coast of the UK, we have 5 pools ready to be opened and prepared for another season of pool cover testing. Luckily, our pools have been covered with our award-winning EnergyGuard™ Selective Transmission pool cover material over the Winter period, so we know that opening our pools will be pretty painless this year.
All pool owners know that opening the pool for the season can be costly and time consuming, but did you know how much easier and cheaper this can be by simply choosing the right pool cover?
Selecting the right cover can dramatically reduce the maintenance time required to bring your pool back to a usable condition.
EnergyGuard™ Selective Transmission’s patented properties create a cover for summer and winter keeping the pool clear, reducing chemicals costs and saving time – giving you more time to enjoy your pool!
So with opening up the pools fresh in our minds, here is a comprehensive guide to a quick and cost effective pool opening.
Remove cover
Wind up your pool cover, being careful to ensure that as few leaves and debris enter the pool as possible.
Clean your cover
Place your cover on a flat surface, flat side up with the bubbles facing down.
If laying the cover on a lawn to be cleaned, please take care not to leave your cover on your lawn for too long, as the cover’s solar heating properties may lead to scorched grass.
Rinse your cover down with a hose or jet washer (ensure this is kept 20cm – 30cm away from cover) and use a soft brush to remove embedded residue.
Clear your pool of debris
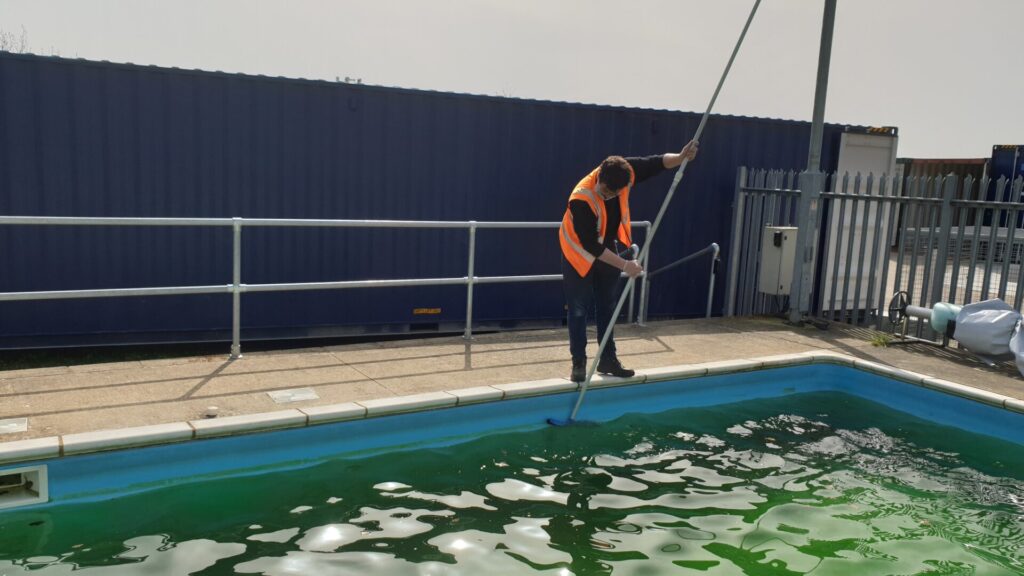
Use a deep net or skimmer net to clear debris and leaves from the pool. Open and empty the skimmer baskets, and clean inside of the skimmer.
Brush away algae and dirt off walls and floor of the pool using a soft pool brush. Remove inlet cover plates and eyeball inlet nozzles and clean.
Deep clean your pool
Vacuum the pool – Run your robotic cleaner to remove the last residue at the bottom of the pool.
Top up water levels
Run a hose line to the pool and bring the water level to the middle of the skimmer.
Set up the filter
- Ensure your pump is switched off and turn off inlets, main drain, and skimmer valves to pump and filter.
- Open the lid to the pump remove the pump filter basket.
- Clean the pump filter basket and reinstall.
- Ensure the pump seal is clean and reinstall.
- Use a bucket of water to help prime pump.
- Replace pump lid.
- Open inlets, main drain, and skimmer valves to pump and filter.
- Switch on pump for 24 hours, ensuring the multi-port valve is set to “filtration”.
- Backwash the pool filtration as required.
Read more about EnergyGuard™ Selective Transmission in The GeoBlog:
Product Feature: EnergyGuard™ Selective Transmission
Is it OK to leave an EnergyGuard™ Selective Transmission cover on your pool over the winter?
Check chemical levels and balance pool
Take water samples from the pool (ensure taken 20cm under the water level). You will need to check your:
- pH
- Calculate Total Chlorine (Free Chlorine + Combined Chlorine)
- Calcium Hardness
- Total Alkalinity
Take appropriate actions to balance the chemical levels, taking time to allow chemicals to settle. Add stabilised chlorine to level the pool between 2-4ppm and allow to settle. Recheck chemical levels
Shock the pool (if required)
Before shocking the pool, you should always ensure that you are wearing your PPE.
Weigh out shock chlorine, and fill your bucket with warm water. Add the required shock to the bucket slowly, and stir until dissolved. Slowly add the shock to the pool moving around the pool and ensuring not to splash and to pay attention around the skimmer. Ensure all of your pool equipment is cleaned thoroughly. Leave and allow the shock to do its work. Repeat as needed.
Reinstall the cover
Only put the cover back on your pool when the chemical levels have returned to industry standards.
Set the pump and filtration timings
Check the inlet nozzles are set to provide the best possible circulation, and set the filtration time schedule ensuring enough time to completely circulate the pool. For best heating performance set filtration to turn during the sunlight hours between 11 and 4.
Check, check and Recheck
Recheck pH, Free Chlorine, Combined Chlorine and Total Chlorine and make adjustments if required.
Now your pool should be clean and ready to enjoy for the Summer season!
Please remember – a pool cover is only efficient when it’s on your pool. So whenever your pool is not in use, pop your cover back on and continue to take advantage of all the benefits of a GeoBubble™ pool cover.
Top tips from R&D:
Always add your chemicals to a bucket of water first – never put directly into pool
Make sure that you have separate buckets for the mixing of different chemicals
Remember to rinse your cleaning equipment after use to prevent the reintroduction of algae.
A flocculant can be used to help clear the dead algae dropping it to the pool floor where it can be cleared.
Remember that an imbalanced pool can generate false chemical readings. Use distilled water to dilute the test sample to double check any strange readings.
Take care not to leave your cover on your lawn for too long, as the cover’s solar heating properties may lead to scorched grass.